No Churn Cherry Garcia Ice Cream
This post may contain affiliate links.
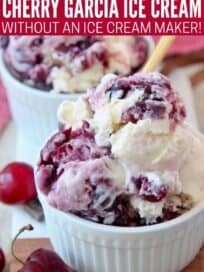
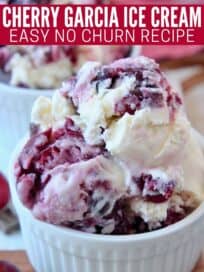

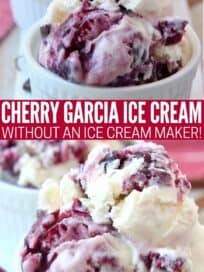
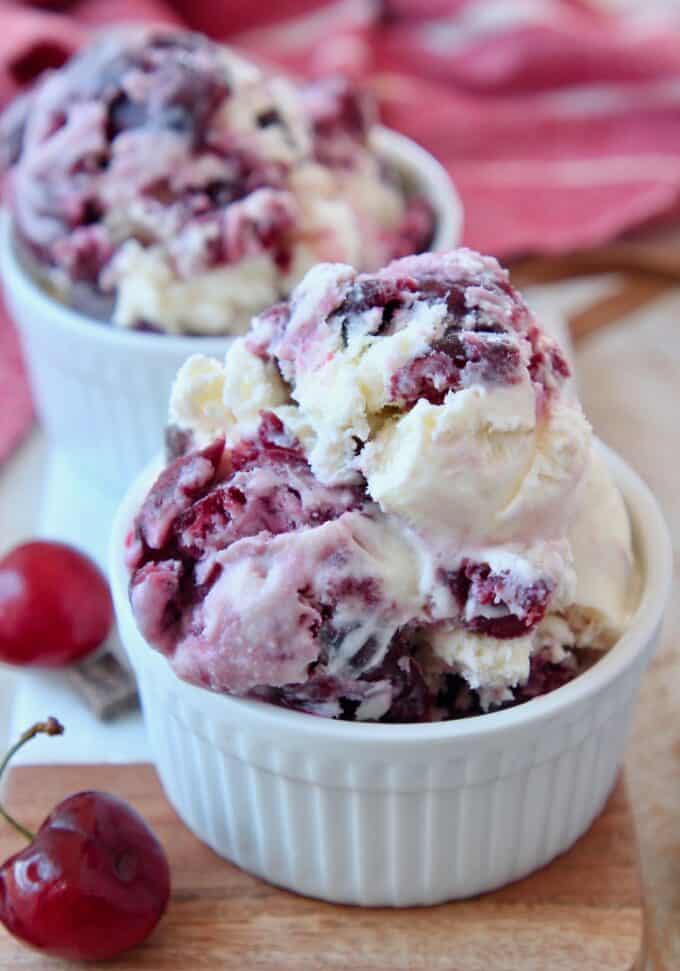
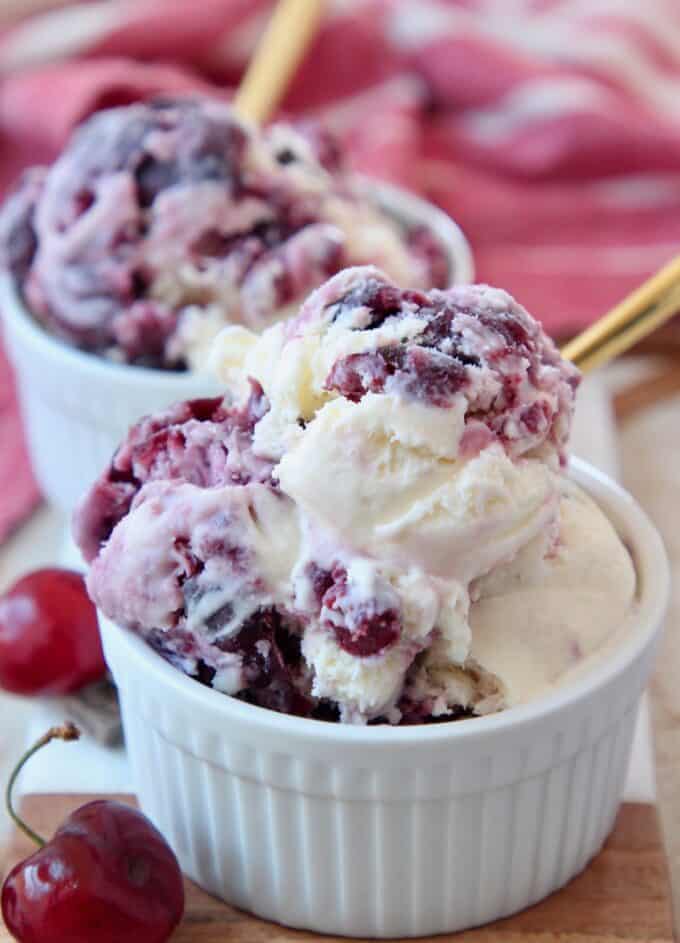
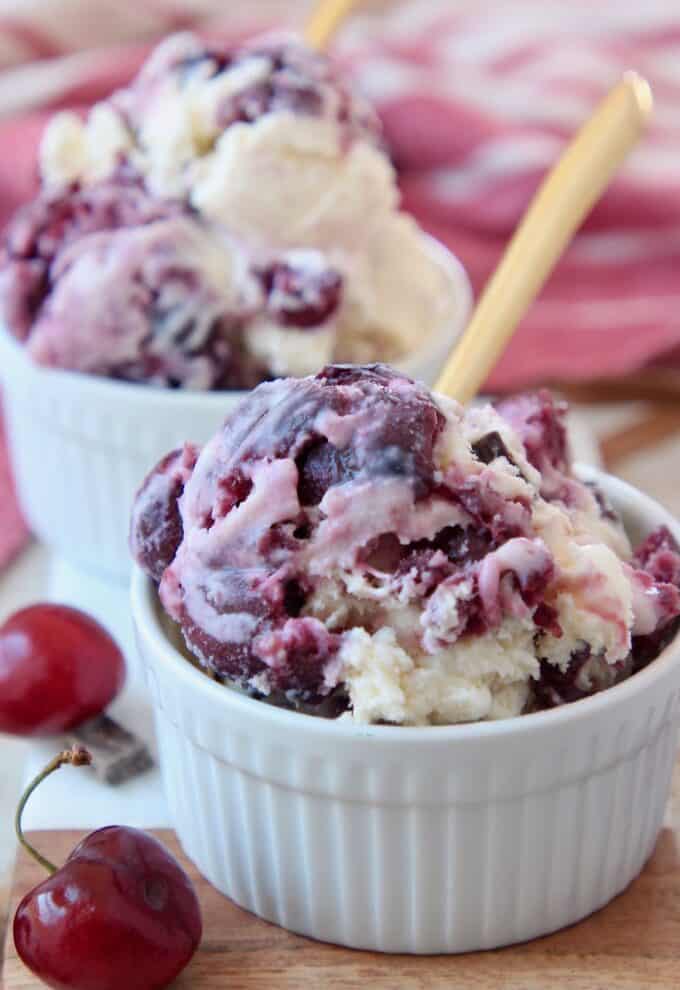
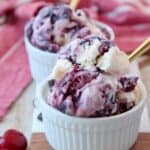
Make Ben & Jerry’s famous Cherry Garcia Ice Cream at home, without an ice cream maker! This no churn recipe is easy to make in only 15 minutes.
It’s made with a delicious cherry swirl and dark chocolate chunks, creating an ice cream flavor as delicious as the original!
If you have to be known for something, being known for your homemade ice cream is definitely not a bad thing! Over the years, I’ve recreated a ton of my favorite ice cream flavors at home, like Moose Tracks, Peanut Butter and Strawberry Ice Cream.
The best part about my homemade ice cream recipe is that it’s no churn. This means that you don’t need an ice cream maker to create any of these delicious ice cream flavors at home!
Ben & Jerry’s iconic Cherry Garcia Ice Cream was created as a tribute to Grateful Dead guitarist Jerry Garcia. A fan-suggested flavor, this famous ice cream dates back to the mid-80s. When recreating it at home, I wanted to give fans that perfect combination of cherry and chocolate in every bite!
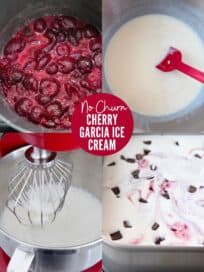
Instead of just tossing some cherries in the ice cream, I decided to take a note from my strawberry ice cream recipe and cook down the cherries first with a little sugar and cornstarch to create a wonderful cherry swirl throughout the ice cream.
Adding this step to the ice cream making process, means you end up with both whole cherries and sweet cherry juice swirled into the ice cream. It pairs perfectly with the crunch of dark chocolate chunks! But don’t worry, even when adding this step, it still only takes 15 minutes to make this incredible homemade ice cream!
Table of contents

Ingredients you’ll need
- Canned dark sweet cherries – the flavor of cherries that you use in this recipe will make a huge difference in the taste. You do not want to use tart cherries to make this recipe, you want to use sweet cherries. I found these canned sweet cherries at Walmart, they’re also available on Amazon and I’m sure you can find them at most major grocery stores near the canned pie cherries.
- Sugar
- Cornstarch
- Sweetened condensed milk – this canned milk can be found on the baking aisle at most major grocery stores.
- Vanilla extract
- Sea salt
- Heavy cream – this may also be called heavy whipping cream. The two can be used interchangeably in this recipe.
- Dark chocolate chunks – feel free to use the chocolate of your choice. You can use chocolate chips or a chopped up chocolate bar. I do recommend using dark chocolate whenever possible, as it pairs perfectly with the cherries!
Step by step instructions
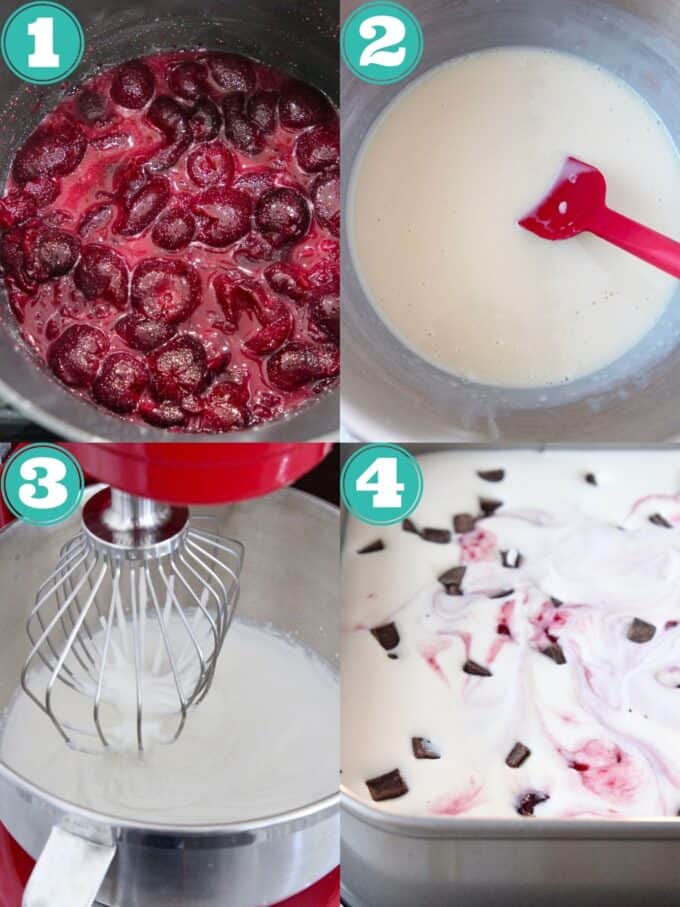
- Cook down the cherries.
- Drain any liquid from the can of cherries.
- Add the drained cherries to a medium saucepan on the stove over medium heat.
- Add sugar and cornstarch to the saucepan and stir to combine everything.
- Once the mixture begins to bubble on the stove, allow it to continue cooking for 5 minutes.
- During the cooking process, use the back of a spoon to smash some of the cherries, while keeping some of the cherries whole.
- After the cherries have cooked down on the stove, remove them from the heat and allow them to cool while preparing the ice cream base.
- Combine the sweetened condensed milk, vanilla extract and sea salt in a medium mixing bowl.
- Whip the heavy cream.
- Use a stand mixer, or electric hand mixer, to whip the heavy cream on medium high speed for 4-5 minutes, or until firm peaks form.
- Note: You can also hand whip the heavy cream if you don’t have a mixer at home. This will also provide you with a great arm workout!
- Use a stand mixer, or electric hand mixer, to whip the heavy cream on medium high speed for 4-5 minutes, or until firm peaks form.
- Combine all of the ice cream ingredients.
- Fold the condensed milk mixture into the whipped cream with a rubber spatula until combined.
- Stir in the chocolate chunks, then swirl in the cherries.
- Pour into a 2 quart container, preferably metal, as it will freeze the ice cream quicker.
- Cover with plastic wrap and place in the freezer.
- Freeze for at least 5 hours, or overnight.
Tips and tricks
- Freezing the ice cream in a metal container will make it freeze faster. If you want your cherry garcia ice cream ASAP, pour the ice cream into a metal container to freeze.
- Place the ice cream as far back in the freezer as you can for a quicker freeze. You never want to store ice cream in the door, as it is the warmest place in the freezer. But I have also found for homemade ice cream, the further back in the freezer you place it, the quicker it will freeze.
- This recipe makes approximately 1/2 gallon of ice cream, which equals 4 pints, or 12 scoops of ice cream.
- This ice cream will stay good in the freezer for 6 months. Always seal the ice cream in an airtight container to avoid freezer burn. I like to use these glass containers to store the ice cream. This recipe will perfectly fit into two of these containers.
- This cherry garcia ice cream recipe is gluten free. Just make sure the chocolate you’re using is gluten-free. Most chocolate chunks, chips or bars are naturally gluten free, but it’s always good practice to check the label, just to be sure!
- Do NOT make substitutions. This recipe works perfectly with the simple combination of heavy cream and sweetened condensed milk. Substituting either of these ingredients can vary the final result of the ice cream taste and texture.
- Use a wet ice cream scoop to scoop out the ice cream after it’s frozen. I actually learned this trick at my first job, working at a frozen custard shop. A wet ice cream scoop means the ice cream will come out of the scoop and into your bowl much easier!
Frequently asked questions
- Can you make this recipe with fresh cherries? Yes, follow the recipe as instructed, but instead of using canned cherries, use two cups of fresh, pitted cherries. The cherries should be a red sweet variety, such as a bing, chelan, lapins, lambert or tulare.
- Can you make this recipe with frozen cherries? Yes, follow the recipe as instructed, but plan to add at least 5 minutes to the cooking time for the cherries, as they’ll need to defrost and become soft enough to smash in the saucepan on the stove. Once again, be sure to use a sweet frozen cherry to make this recipe.
- Can you make this recipe without chunks of cherries? Yes, if you prefer a cherry ice cream without chunks, simply puree the cooked cherry mixture in a blender or food processor before folding it into the ice cream.
- What toppings would you recommend adding to this ice cream? I’m a big fan of this ice cream on it’s own, but I’d be lying if I said adding a drizzle of chocolate syrup and a dollop of whipped cream on top wouldn’t be delicious!
How to make mini cherry garcia ice cream cakes
Use this recipe for Mini Ice Cream Cakes. It’s super simple! Just prepare a box of chocolate cake mix, then fill cupcake liners with a tablespoon of batter and bake the cupcakes for 14 minutes.
Cool the cupcakes in the freezer, then top each one with a scoop of this homemade cherry garcia ice cream. Return to the freezer for 2 hours, then serve! This is such a fun and easy way to serve cherry garcia ice cream cakes, all summer long!
More no churn ice cream recipes
Stock up your freezer with all of your favorite ice cream flavors! Be sure to check out each of these ice cream recipes, all easy to make without an ice cream maker!
- Peanut Butter Ice Cream
- Moose Tracks Ice Cream
- Strawberry Ice Cream
- Milk & Cookies Ice Cream
- Salted Caramel Ice Cream
- Peppermint Bark Ice Cream
- Chocolate Ice Cream
No Churn Cherry Garcia Ice Cream
Ingredients
- 15 ounce can dark sweet cherries, drained
- ⅓ cup sugar
- 1 tablespoon cornstarch
- 14 ounce can sweetened condensed milk
- 2 teaspoons vanilla extract
- ¼ teaspoon sea salt
- 2 cups heavy cream, cold
- ½ cup dark chocolate chunks, or chocolate chips
Instructions
- Drain any liquid from the can of cherries.
- Add the drained can of cherries to a medium saucepan on the stove over medium heat.
- Add the sugar and cornstarch and stir to combine the ingredients.
- Once the mixture begins to bubble, reduce the heat slightly and allow it to cook down for an additional 5 minutes.
- During the cooking process, use the back of a spoon to smash some of the cherries, while keeping some of the cherries whole.
- After the cherries have cooked down on the stove, remove them from the heat and allow them to cool while preparing the ice cream base.
- In a medium bowl, whisk together the sweetened condensed milk, vanilla extract and sea salt, set aside.
- Whip the heavy cream with a stand mixer, or electric hand mixer, on medium-high speed until firm peaks form, about 4-5 minutes.
- Fold the condensed milk mixture into the whipped cream with a rubber spatula until combined.
- Stir in the chocolate chunks, then swirl in the cherries.
- Pour into a 2 quart container, preferably metal, as it will freeze the ice cream quicker.
- Cover with plastic wrap and place in the freezer.
- Freeze for at least 5 hours, or overnight.
Notes
- You can make this recipe with fresh cherries. Follow the recipe as instructed, but instead of using canned cherries, use two cups of fresh, pitted cherries. The cherries should be a red sweet variety, such as a bing, chelan, lapins, lambert or tulare.
- You can make this recipe with frozen cherries. Follow the recipe as instructed, but plan to add at least 5 minutes to the cooking time for the cherries, as they’ll need to defrost and become soft enough to smash in the saucepan on the stove. You’ll want to use two cups of sweet, pitted frozen cherries.
- Freezing the ice cream in a metal container will make it freeze faster. If you want your cherry garcia ice cream ASAP, pour the ice cream into a metal container to freeze.
- Place the ice cream as far back in the freezer as you can for a quicker freeze. You never want to store ice cream in the door, as it is the warmest place in the freezer. But I have also found for homemade ice cream, the further back in the freezer you place it, the quicker it will freeze.
- This recipe makes approximately 1/2 gallon of ice cream, which equals 4 pints, or 12 scoops of ice cream.
- This ice cream will stay good in the freezer for 6 months. Always seal the ice cream in an airtight container to avoid freezer burn. I like to use these glass containers to store the ice cream. This recipe will perfectly fit into two of these containers.
- This ice cream recipe is gluten free. Just make sure the chocolate you’re using is gluten-free. Most chocolate chunks, chips or bars are naturally gluten free, but it’s always good practice to check the label, just to be sure!
Nutrition Facts
We are a participant in the Amazon Services LLC Associates Program, an affiliate advertising program designed to provide a means for sites to earn advertising fees by advertising and linking to amazon.com.


5 Comments on “No Churn Cherry Garcia Ice Cream”
I made this but didn’t realize we had to whip the heavy cream into peaks, because I bought light cream instead to save on some fat. I just skipped the whipping step and dumped in the mini chocolate chips. I dumped it all in an ice cream maker and ran it, then dumped the cherries in half way through and ran it more. It came out the same consistency as usual and my daughter loved it! She said it was the best ice cream I’ve made. I did make grape ice cream before so I still hear about that even tho my wife likes it.
Huge hit!
So glad to hear it Veronica! Thanks for taking the time to leave a rating for the recipe!
Hello, your ice cream recipes sound amazing. I have a ton of mangos and want to make mango ice cream but I don’t really want to cook them before, especially not with more sugar since I don’t like too much sugar and they are so sweet anyway. Can I skip the cooking process and just add the junks?
Hi Lysann, you can, but just know that the chunks of mango will freeze in the ice cream if they’re not cooked down before, so they will be a little hard when you bite into them. You could always cook them down, but not add the sugar, that would be my recommendation!